This blog is the first of a series where I will show how to use Formal Verification (FV) with a pragmatic, realistic, predictable, and efficient approach. The goal of this blog series is not to explain how FV works, but how to use best practices to achieve verification targets. Indeed, having efficient tools is one thing, bringing higher quality is another thing. I will tell a real life story where FV has been used within Codasip and provided excellent results.
If you have a basic understanding of FV principles (if you don’t I recommend reading this book), and experience in digital hardware design and verification, then this case study is for you.
A bit of context
Our tools and IPs
First things first. Let me give you some context. At Codasip we develop processor design solutions to enable Custom Compute. In other words, we develop an EDA tool called Codasip Studio and RISC-V processor IPs. With such an approach, we are able to provide an end-to-end methodology, supported by a tool, in order to customize these IPs.
Codasip Studio is our design automation toolset. It offers a library of generic modules which can be instantiated within IPs. One of these is a highly configurable cache to be connected to a processor, using an AHB or AXI interface.
What happened
During the development of the cache an important bug was found: a deadlock.
The bug is visible when the following sequence is reproduced:
- At a specific index, all cache ways are occupied.
- The processor triggers a request to the cache for an address targeting the same index. It misses in the cache.
- The cache starts the eviction of one line at this index.
- The external memory returns an error response on this eviction. It is forwarded to the processor.
- The CPU may repeat the same request.
- The cache never responds and holds the HREADY output signal to 0 forever, meaning that it never accepts any new request from the processor, which creates the deadlock.
Extending verification efforts
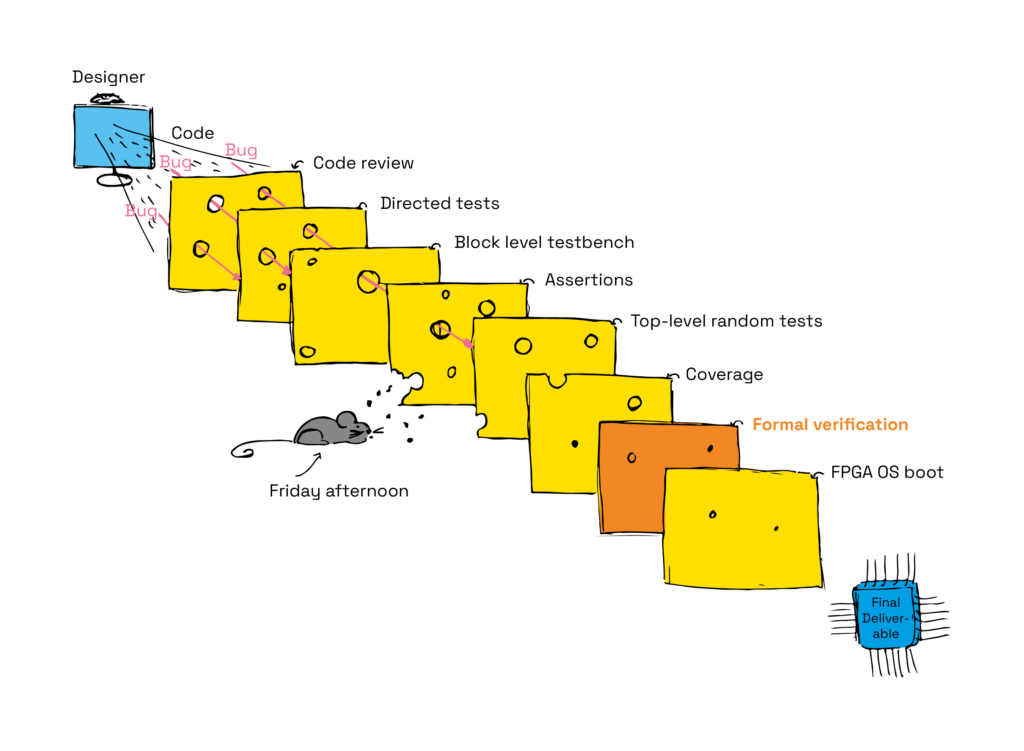
As we discovered this unexpected bug in simulation, we decided to extend our verification efforts on this component to, maybe, find other bugs, and to increase its quality. We decided to do so by introducing an additional method: formal verification. As Philippe Luc, Director of Verification, explained in his article on adopting a Swiss cheese model for verifying processors, using different verification methods shows real benefit.
Also, FV is an agile approach for which the setup phase is much faster than for a simulation testbench.
We put in place a team to achieve everything we could with FV within one month. The first goal was to ensure the deadlock bug is reproducible, then to verify that the RTL fix is correct. Of course, this FV approach raises the overall thoroughness of the verification, and has the potential to find other bugs.
In the next posts in this blog series, I will detail the FV best practices we used as part of this effort. It was applied on a relatively small and simple design, however most of these can be applied on larger and more complex designs, and are not specific to caches. They can also be applied for example on a processor core.
For now, let’s focus on the setup and our first steps in this one-month timeframe.
Cache description
The cache module can be configured to handle either:
- Instruction fetches.
- Data fetches.
- Both.
It has many parameters to set the address and data bus widths, the total size, the cache line size, the associativity, the endianness, etc.
It has AHB or AXI interfaces. We focused on the AHB one, configured for both instruction and data because it is the most widely used in the field, and it is the most complete configuration of this component.
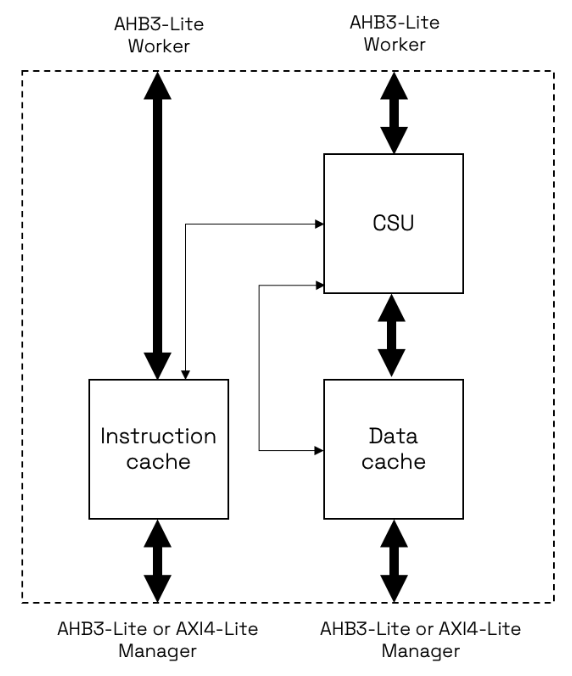
The “Worker” ports are connected to a CPU, and the “Manager” ports are connected to another cache level, an interconnect, or an external memory.
Formal setup
Formal verification is usually fast and simple to set up on a new design. This is because the first FV runs only need the following inputs:
- The list of RTL files.
- Possibly configuration flags and parameters.
- Clock and reset definitions.
We used an internal framework which allows us to do this setup in a tool agnostic way. So the first formal run was possible after less than one hour. We will see later how this framework also eases the usage of the main formal techniques.
At the time the bug was found in the cache, the assertions were not written yet. This means that the FV tools were able to load the design, but they had nothing to verify.
We had to make a decision. Should we spend time adding low-level assertions at this stage, or not? We decided not to because:
- Designers were not available to help write these assertions, meaning that a formal engineer would have to learn the microarchitecture and to use a lot of reverse engineering.
- It would be difficult to write low-level assertions that highlight the deadlock bug, unless we considered the exact scenario we already knew, which is a weak verification methodology.
- The design functionalities are well defined, allowing us to be more ambitious and to target high-level assertions (also named “end-to-end”) instead. The advantage is that these assertions can be written just by knowing that the module is a cache, This requires a very limited knowledge of its microarchitecture. Also, these assertions have a very large coverage, able to catch most of the potential bugs.
First runs and formal testbench construction
The first FV runs must not target assertions but cover properties. For a cache, these properties allow a FV tool to generate scenarios showing for example a cache miss, a cache hit, or an eviction. Examining these scenarios helps us understand how the formal testbench needs to be completed.
For this cache, and probably for all caches, an automatic “invalidate all” operation is triggered out of reset. This is to make the cache empty at start, however it consumes thousands of cycles. This is a huge penalty for FV, preventing the cover property on a cache miss to be covered.
The first addition to the formal testbench is therefore an abstraction of the invalidation counter. All tools allow you to do so with specific commands. With this abstraction, the cover properties are then reachable in a few cycles, instead of thousands of cycles. This skips the invalidation and so allows the cache to start operating with “any” content, which may not be coherent. We will see in the following blog posts that this is an advantage, and how to ensure coherency.
Again to save some initialization cycles, we abstracted the initial value of some configuration registers: the one setting the cache on or off, the one selecting the eviction policy, etc.
These abstractions do not allow deeper bounds when running proofs, but they allow to get to interesting states in fewer cycles.
As usual with FV, large arrays are not good, therefore we abstracted the cache RAMs: tagram. dirtyram, and dataram. Again, specific commands allow all FV tools to do so.
Our framework has dedicated features to define such abstractions, and then to enable or disable them on-demand. As for the rest, the advantage is that this is fully tool independent.
Protocol checking
However, the first generated scenarios were not realistic. They showed incorrect input sequences, which may or may not impact the behavior of the design. The interfaces of the cache use the AMBA AHB protocol so we immediately connected AHB protocol checker instances to constrain these interfaces. Given the simplicity of this protocol, we developed our own one.
At that point we started to get realistic traces for our cover properties, in a reasonable amount of time.
OK, now let’s pause and think.
We just added AHB protocol checkers to constrain the interfaces. Why don’t we also use these to verify the interfaces?
We did that. And got our first genuine bug with FV in just a couple of days.
The bug appears as a violation of an assertion that checks the address bus correctness. It is caused by a missing state handling in an FSM, leading to the propagation of Xs on this address bus. This shows another advantage of FV: Xs have an exact semantics. On the contrary, simulation does not propagate Xs correctly and may mask some related bugs (see this paper). So simulation missed that bug.
Recap
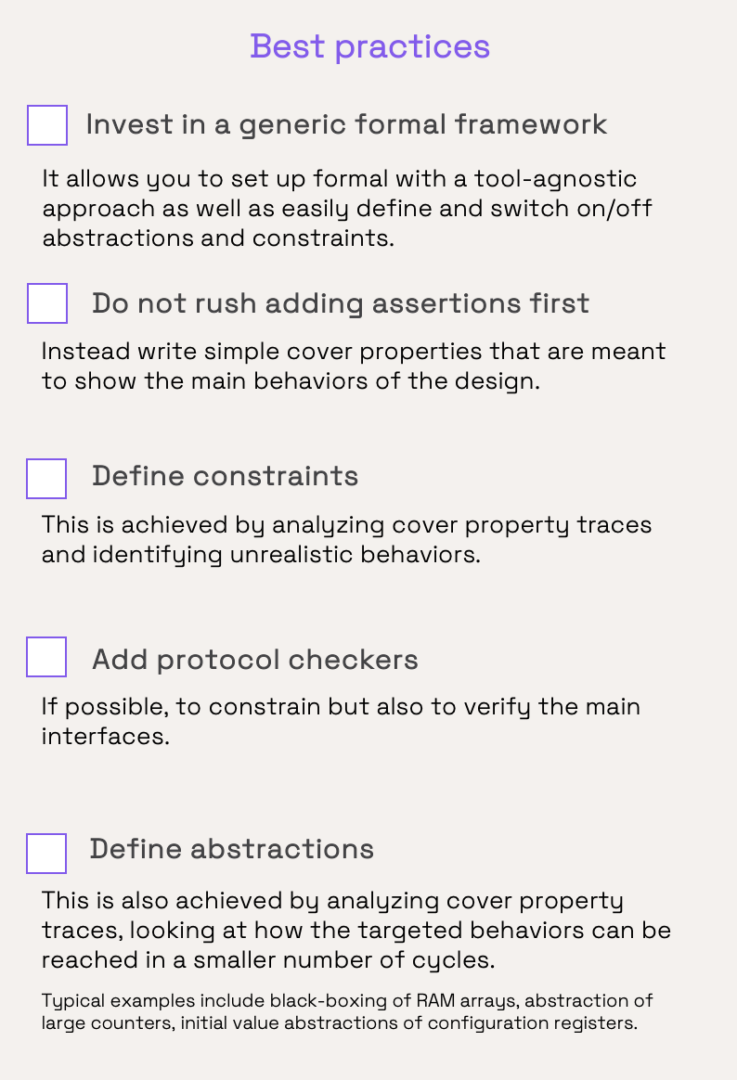
In this first episode, we’ve seen some best practices you can apply when starting formal verification on a component.
In the next episode, we will see how we used other good practices to verify the deadlock bug that we were targeting, and how we went much further than anticipated into the verification of the cache thanks to FV.